
cPanel Webmail: Email Filters Setup Guide
This guide walks you through creating and managing email filtering rules in cPanel Webmail to automatically sort incoming mail into folders, forward messages, or block unwanted senders.
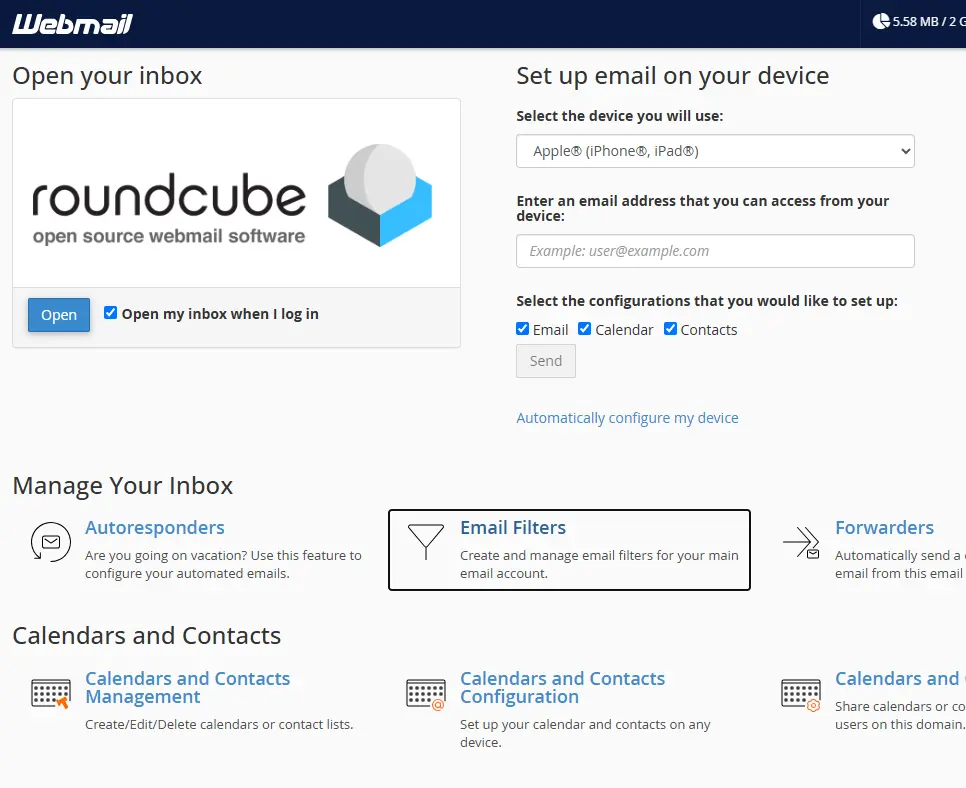
Step 1: Navigate to Email Filters
- Log in to your Webmail.
- On the Webmail home dashboard (Jupiter theme), locate the Manage Your Inbox section.
- Click on Email Filters.
Note: If you are automatically redirected inside Roundcube (your inbox), click Webmail Home in the sidebar or top menu to return to the main dashboard.
Step 2: Create a New Filter
- In the Email Filters overview, ensure the current target account displays
[email protected]. - Click the Create a New Filter button.
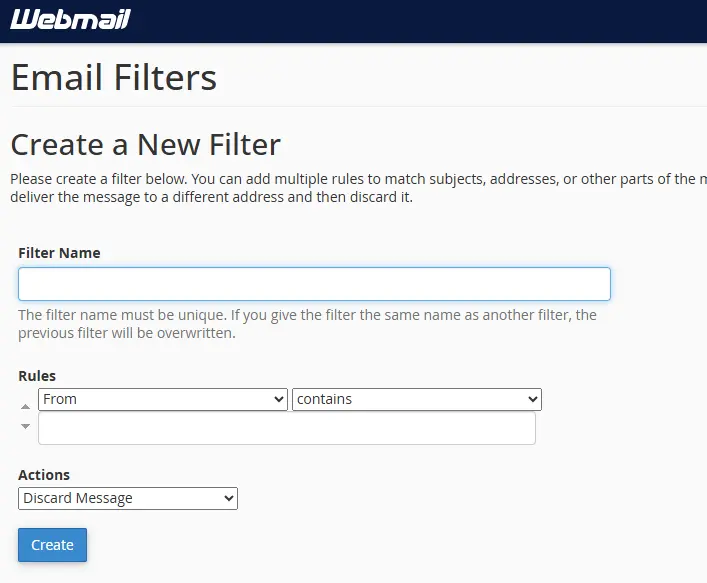
Step 3: Configure Filter Rules and Actions
Complete the following sections on the configuration page:
1. Filter Name
- Provide a descriptive name for the rule (e.g.,
Invoices - Move to Accounts,Vendor Newsletter Archive, orBlock Unwanted Senders).
2. Rules (Trigger Conditions)
Define when this filter should execute. A standard condition consists of three parts:
- Header / Part (Field 1):
From— Evaluates sender address or display name.Subject— Evaluates the email subject line.To— Evaluates recipient address.Body— Evaluates the message text content.
- Operator (Field 2):
contains— Most commonly used; triggers if the keyword appears anywhere within the field.equals— Exact match required.does not contain— Inverts the match.begins with/ends with— Positional matching.
- Criteria / Keyword (Field 3):
- Enter the specific email address, domain, or keyword (e.g.,
billing,@newsletter.com, orstatement).
- Enter the specific email address, domain, or keyword (e.g.,
Combining Criteria: Click the
+icon to add additional criteria usingand(all conditions must match) oror(any condition triggers the rule).
3. Actions (What happens when triggered)
Select the action to take when an incoming email meets the criteria:
- Deliver to Folder:
- Click Browse and select the destination folder (e.g.,
Archive,Finance, orJunk).
- Click Browse and select the destination folder (e.g.,
- Discard Message:
- Deletes the email permanently without delivery or sending a bounce notification back to the sender.
- Fail With Message:
- Rejects the email and sends an automated bounce error message back to the sender.
- Redirect to Email:
- Forwards the incoming email to another specified email address.
Step 4: Save and Verify
- Review the rule conditions and target action, then click Create.
- Rule Priority: The server processes filters sequentially from top to bottom. If multiple filters are configured, drag and drop them within the filter list to adjust execution priority.
Best Practices:
- Avoid pairing broad conditions like
Body containswithDiscard Message, as this can inadvertently drop legitimate business emails. - When creating aggressive blocking rules, configure the initial action to Deliver to Folder (such as a designated review folder) for a few days to ensure valid communications are not missed before switching to discard.